


We are moving all Atari Lynx related content over to Atari Lynx Vault and all our shop content over to K-Retro Gaming. Please update your bookmarks!
As a result of this change, the following will no longer be available: Online Lynx Emulator, Collection Tracker, Game Ratings, News. If you are interested in contributing content to Atari Lynx Vault, we are seeking editors and maintainers.
Why is this happening? First - the Atari Gamer branding is changing to K-Retro Gaming to allow us to expand to providing games, replacement parts, and mod services to other game consoles. And second - The content management system running Atari Gamer is out of date and Google AppEngine (where the website runs) will no longer allow it to run after the 30th January 2024, so in order to preserve all content we switched to a new and modern content management system and chose a website domain that better suits the subject matter. Since we are operating this website in our spare time, on top of full time family and job committments, some features had to be dropped.
Making your own Atari Lynx shelving system can be a lot of fun. Definitely check out the previous Atari Gamer article on another example of game shelving; as you can see, there are heaps of ways you can store games!
My goal was to keep the project under $100. One of the big questions to ask was, 'How am I going to do this - make my own, or customize something that another person has made?' Being not so handy at carpentry or physical work myself, I decided to go the second route and see what was out there in the stores that I could modify. And thankfully, I was surprised and happy to see that K-Mart (Australia) had something that suited the job just fine.

These K-Mart shelves were ideal because I had an all white office with beige features. The sides were timber in appearance, but the rest was bright white. At only $15 each, I decided to grab six and see what they would look like joined together. Also, I needed to consider what orientation they should be: portrait or landscape.
After measuring everything up, it looked best if the shelves were placed on their sides. This would allow the games to stand independently inside the shelving system. The depth was not enough to encase the games entirely, but this wasn't such a bad thing. It made the games easier to access. So, onto the next stage!
The back hooks and screws on these shelves had to be removed. They were just going to get in the way, and they would cause issues when it came to bolting everything to the wall. So, it was crucial to get the screwdriver set out and begin unscrewing all these hindrances. They were tight… so some blisters were in order!


Next it was all about bolting all the shelves together. Once they were affixed, it was a matter of attaching them to the wall. In the meantime, there was another extra touch I wanted to see if I could implement. The smaller openings of the shelf system were not big enough to hold games. So, what to do with those?
I had some parchment paper that I bought a long time ago, but had no use for it until now so decided to see if I could make some 'gold' looking Atari Lynx logo designs and print them directly onto the parchment. In order to do this, I had to attach the parchment paper with sticky tape onto the regular A4 printer paper first.
This was the result of affixing the parchment paper onto the A4 printer paper. It looked a bit messy with the sticky tape attached, but I was confident that it would be flat enough to pose no issues with the printer. So now it was onto finding a logo and printing it onto the parchment itself.


I found a Lynx logo and downloaded it. In order to do graphic manipulation on my Mac, I used a great program called 'Sketchbook Pro'. My version was a bit old, but I have never seen a need to update it, because it did minor edits extremely well. I cropped the logo, and then used Apple Preview to make it sepia.
Printed the golden logo onto the parchment and… voila! Done! This process had to be repeated more than a few times because I needed a grand total of 24 parchment papers on 24 A4 pages. Phew! It was tedious work, but I had in the back of my mind that the end visual effect would likely be worth it.


The next step was laminating each of the parchment logos and cutting them out. In cutting out the laminated squares, the A4 paper backing simply fell away, leaving just the parchment logo with a nice clean sheen. All of these were now ready to place on the unused shelf inlets. Nearly there!

Bam! One shelf up, the rest to go. The laminated parchment logos were ready to be put in, so these were simply placed in their crevices by use of some Blu-Tak. Yes, this was a fairly simple method, but I didn't want to risk using the wrong glue and causing unfortunate ripple effects. Plus, if I didn't like the end result, this gave me the choice of removing them. In the end, I was happy with the result.

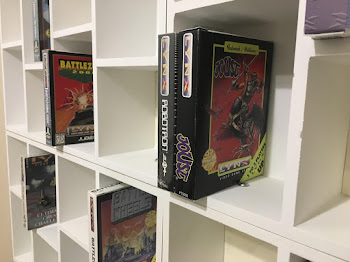
It was completed! After actually getting the thing on the wall, the adhering of all the laminated parchment squares was long and laborious. But once they were up, the pattern was a cool way of establishing the Lynx branding on the shelves. The games themselves were 4 per shelf, meaning there were 92 spaces for both official releases as well as homebrew games.

So…who's up for a game of 'Robotron 2084'? See you all next time!
This article was originally submitted by Jon Mc from JMac Productions
If your download doesn't start automatically after 10 seconds, please click here.