


We are moving all Atari Lynx related content over to Atari Lynx Vault and all our shop content over to K-Retro Gaming. Please update your bookmarks!
As a result of this change, the following will no longer be available: Online Lynx Emulator, Collection Tracker, Game Ratings, News. If you are interested in contributing content to Atari Lynx Vault, we are seeking editors and maintainers.
Why is this happening? First - the Atari Gamer branding is changing to K-Retro Gaming to allow us to expand to providing games, replacement parts, and mod services to other game consoles. And second - The content management system running Atari Gamer is out of date and Google AppEngine (where the website runs) will no longer allow it to run after the 30th January 2024, so in order to preserve all content we switched to a new and modern content management system and chose a website domain that better suits the subject matter. Since we are operating this website in our spare time, on top of full time family and job committments, some features had to be dropped.
If you purchased the Atari Lynx Cart Reader/Writer (Programmer Pi-Hat) and you're not sure how to get started with connecting it to your Raspberry Pi, follow this guide. All you need is either an Allen/Hex key or a Pentalobe screwdriver for M2.5 Hex Screws.
Along with the board, you should have received the following in your kit:

Step 1 - Using one screw per standoff, attach both standoffs on the chip side of the board, on the edge closest to the two chips.

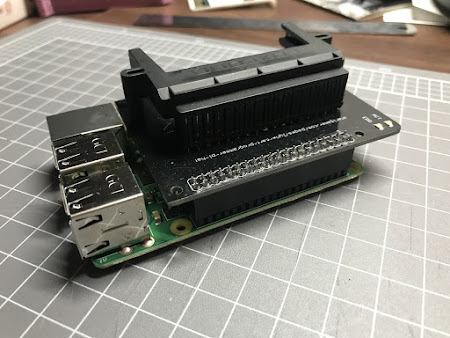
Step 2 - Carefully align the 40pin GPIO pins on the Raspberry Pi to the connector on the board and slide one over the other. All of the pins from the Raspberry Pi should be completely inside the connector from the reader/writer board.

Step 3 - Flip the Raspberry Pi over and using the remaining two screws fasten the standoffs to the Raspberry Pi.


Optional - Even though it is not required to add standoffs around the GPIO connector, you may want to do that for additional rigidity/security and aesthetic reasons. These extra standoffs and screws are not provided but can be purchased separately - M2.5 5mm hex screws and 11mm hex standoffs. If you don't want to buy a bulk lot, get in contact and Atari Gamer can arrange a set for you.

If your download doesn't start automatically after 10 seconds, please click here.