


We are moving all Atari Lynx related content over to Atari Lynx Vault and all our shop content over to K-Retro Gaming. Please update your bookmarks!
As a result of this change, the following will no longer be available: Online Lynx Emulator, Collection Tracker, Game Ratings, News. If you are interested in contributing content to Atari Lynx Vault, we are seeking editors and maintainers.
Why is this happening? First - the Atari Gamer branding is changing to K-Retro Gaming to allow us to expand to providing games, replacement parts, and mod services to other game consoles. And second - The content management system running Atari Gamer is out of date and Google AppEngine (where the website runs) will no longer allow it to run after the 30th January 2024, so in order to preserve all content we switched to a new and modern content management system and chose a website domain that better suits the subject matter. Since we are operating this website in our spare time, on top of full time family and job committments, some features had to be dropped.
Powering an Atari Lynx on the go can be a challenge and you have to admit that using and throwing out 6x AA batteries each time they run flat is not great for the environment. If you're using rechargeable batteries, you're still faced with the task of taking them out of your Lynx each time they run low, recharging, then replacing them. So AA batteries, whether rechargeable or not is our least favourite option.
There have been a number of Atari Lynx hardware mods that dealt with improving its power circuit in the past and so building on that we at Atari Gamer decided to roll a prototype of our own version of a 5V USB power mod.
Note: This mod is available to purchase from our online shop now.

The idea behind this mod is simple - add a micro-USB power socket to the Lynx which will allow the Lynx to be powered from a USB power adapter or a portable USB battery bank. This way you can easily take the Lynx on the road with you and have the convenience of a lighter console (no batteries inside).
So how is this done? Rather simply - supply power directly to the C41 capacitor on the Lynx motherboard. Since 5V USB power is pretty much always guaranteed to be stable, there is no need for additional circuitry and the Lynx runs on 5V internally anyway. So open up your Lynx and find the C41 capacitor, then solder some wires on the opposite side of the motherboard matching the capacitor's positive and negative side. There will be a strip with a minus sign running along the negative side of the capacitor. Use a red wire for positive, black wire for negative.


On the other end of these wires you of course need a micro-USB connector and a way to break out its pins, we used some left over PCBs that we modified from a previous project. If there is enough interest, Atari Gamer will make some custom Atari Lynx micro-USB PCBs available for sale.

We did a quick test run to make sure that the Lynx would power on ok. As soon as 5V is supplied, the Lynx turns on. This is a downside of this mod - the on/off switch in the Lynx doesn't do anything, however many power banks come with their own on/off switches so that's not a big deal. A test run with a breakout PCB is all fine and good but we started this mod with the intention of making it look good too. So to fit this PCB and micro-USB socket into the Lynx requires a bit of rotary tool work and some 3D printing.
First, one of the metal tabs that is used to hold the Lynx strap was removed and then using a rotary tool the cavity was enlarged so that the PCB and the micro-USB connector would fit.


Then, a small shim was 3D printed so that the PCB and the micro-USB socket would fit nicely into the space. Yellow was used to grab attention and signal that this is a power connection.


A hole was drilled through the Lynx, PCB and shim to keep the whole assembly in place using an M2.5 bolt and nut.
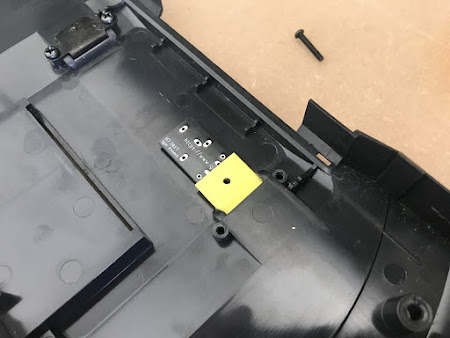

Later, some additional holes had to be drilled though the shim to run connectors to the PCB. The red and black wires were then connected to the positive and ground terminals on the PCB, respectively.


This was the final result...


It looks cool and works perfectly. The only thing that could have been done differently was to have placed the connector on the opposite side so it doesn't get in the way on the D-pad side of the Lynx. It's still very usable this way but any future mods of this kind we'll do will be with the connector on the other side. Also because the original power circuit is not removed, you can still use a 9V adapter or if you so wish, 6x AA batteries with your Lynx...just don't use both the micro-USB power and another power source at the same time.
Would you be interested in a kit so you can do this as well? The kit would include a PCB, 3D printed shim, M2.5 bolt and nut. If there is enough interest in these, Atari Gamer will make it happen. Happy Lynxing!
-AGIf your download doesn't start automatically after 10 seconds, please click here.